How to manage external files in Business Central more easily through a unified API
Oleksandr Shevchuk, Technical Lead of Xpand:
Introduction
One of the most challenging tasks when upgrading Microsoft Dynamics 365 Business Central to SaaS, or when developing modern, compliance-ready solutions in the cloud, is managing external files outside of Business Central. Over the past few years, partners and developers have struggled to build integrations that can upload, store, and retrieve files from external systems in a secure and future-proof way. Different customers have different requirements: some need SharePoint, others prefer SFTP, Azure Blob, or OneDrive. As a result, different partners and developers have often built their own features for interacting with external file systems, each following their own patterns and approaches. Sometimes, this can lead to fragmented solutions that are difficult to maintain, inconsistent in their implementation, and often require extensive custom AL code or external add-ons.
Unified External File Storage API
To address these issues, Microsoft introduced the External File Storage module, previewed in Dynamics 365 Business Central 2025 Release Wave 1. This new feature acts as a unified API and extensible framework for handling external files. It standardizes how files are uploaded, downloaded, and managed, regardless of the selected provider. The framework currently supports built-in providers for Azure Blob, Azure FileShare and SharePoint, but is designed to be easily extended.
Key benefits of such solution are:
- Unified approach for different storage providers
- Simplified AL development with standard API
- Extensible custom scenarios (e.g., OneDrive, SFTP)
How to configure
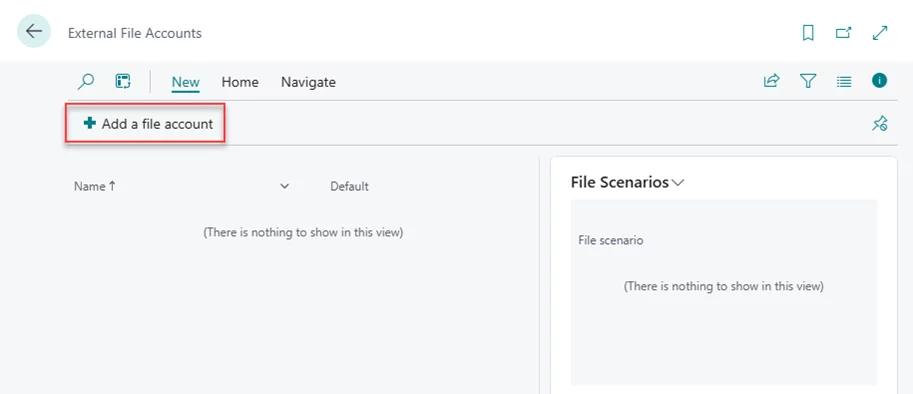
Before you can start using the External File Storage module, you need to configure the required external file accounts. Here’s how to do it:
1. Ensure that the necessary External File Storage Connector apps are installed and ready to use.
2. Open the External File Accounts page in Business Central web client and select Add a file account action.
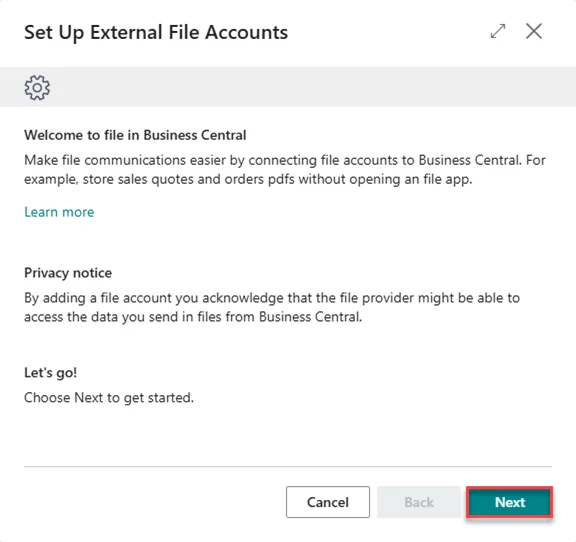
3. Choose Next to get started.
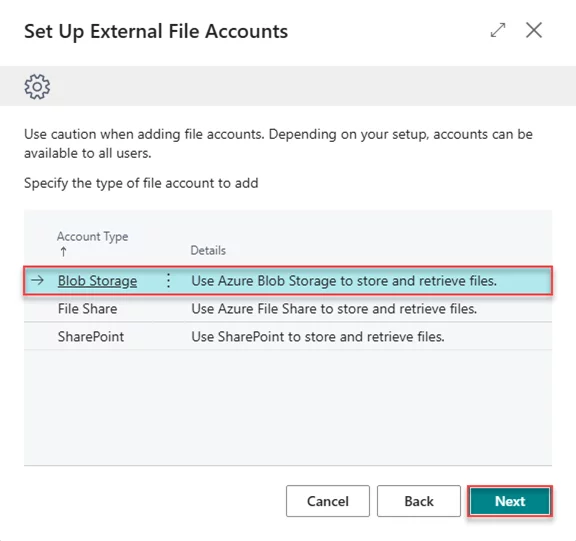
4. Select one of the external file accounts which are available by default, for example Blob Storage, and then click Next.
5. Fill in the following information to set up your Azure Blob Storage account:
- Account Name: The name for this external file account (for identification in Business Central).
- Storage Account Name: The Azure Storage account name.
- Authorization Type: The method used for authentication (Shared Access Signature Token or Shared Key).
- Secret: The actual Shared Access Signature token or Shared Key value.
- Container Name: The specific container within your Blob Storage account.
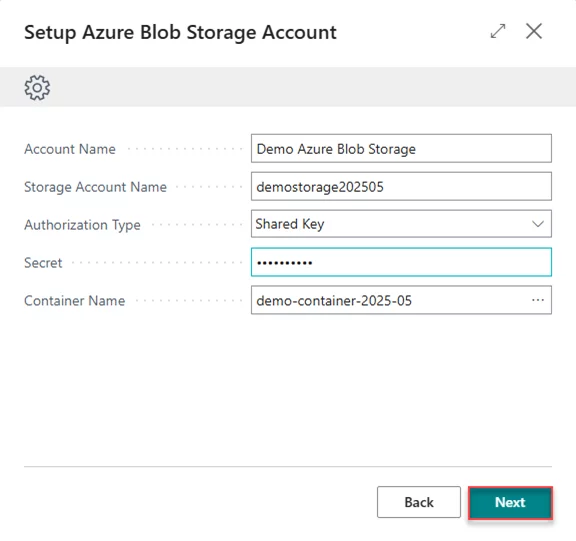
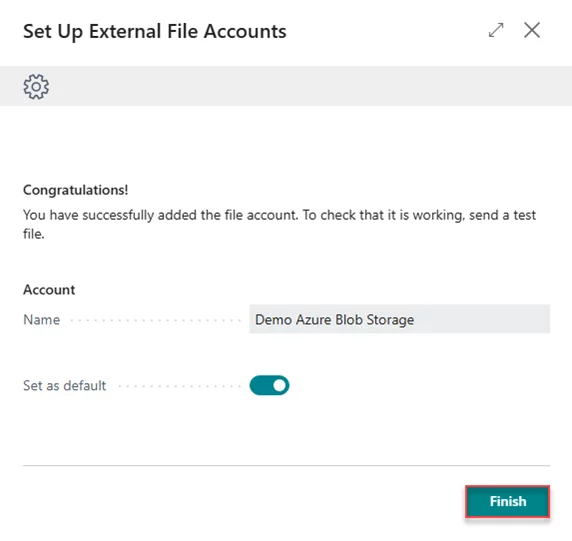
6. Choose Finish to complete the setup.
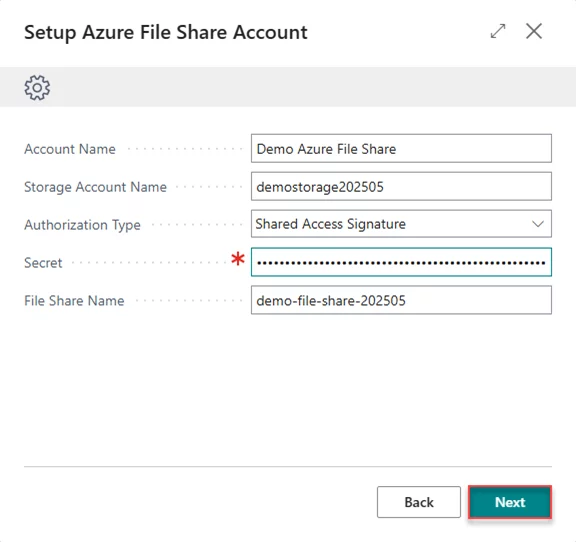
7. Repeat steps 2-6 and fill in the following information to set up your Azure File Share account:
- Account Name: The name for this external file account.
- Storage Account Name: The Azure Storage account name.
- Authorization Type: The method used for authentication (Shared Access Signature Token or Shared Key).
- Secret: The actual Shared Access Signature token or Shared Key value.
- File Share Name: The file share name within your storage account.
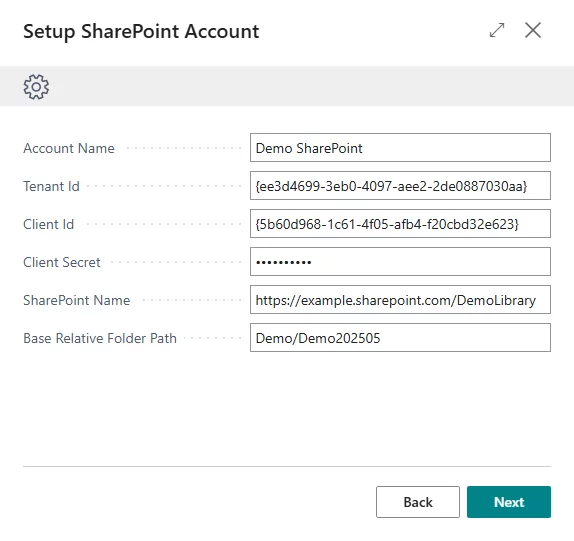
8. Repeat steps 2-6 and fill in the following information to set up your SharePoint account:
- Account Name: The name for this external file account.
- Tenant Id: The Tenant Id of your App Registration.
- Client Id: The Client Id of your App Registration.
- Client Secret: The Client Secret of your App Registration.
- SharePoint Name: The SharePoint to use for the storage account.
- Base Relative Folder Path: The folder path relative to the site collection.
Start with the document library or folder name (e.g., Shared Documents/Reports). This path can be copied from the URL of the folder in SharePoint after the site collection (e.g. /Shared Documents/Reports from https://mysharepoint.sharepoint.com/sites/ProjectX...).
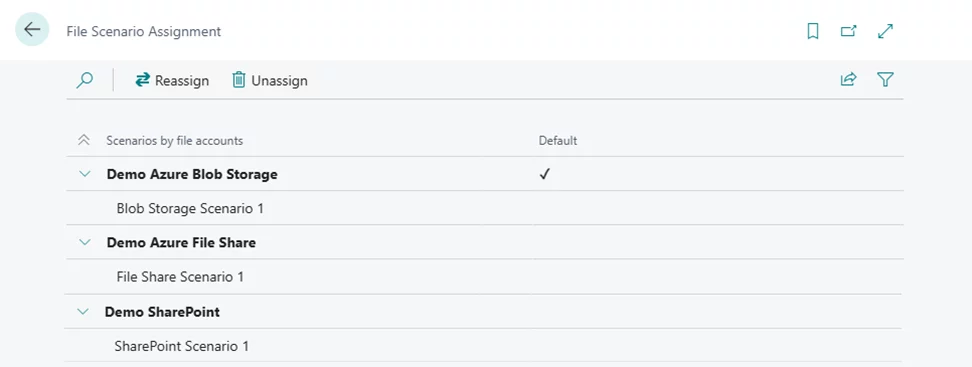
Now you have three new external file accounts created and ready to use.
How to navigate through External File Storage
After completing the configuration, you can start interacting with your external storage directly from the External File Accounts page:
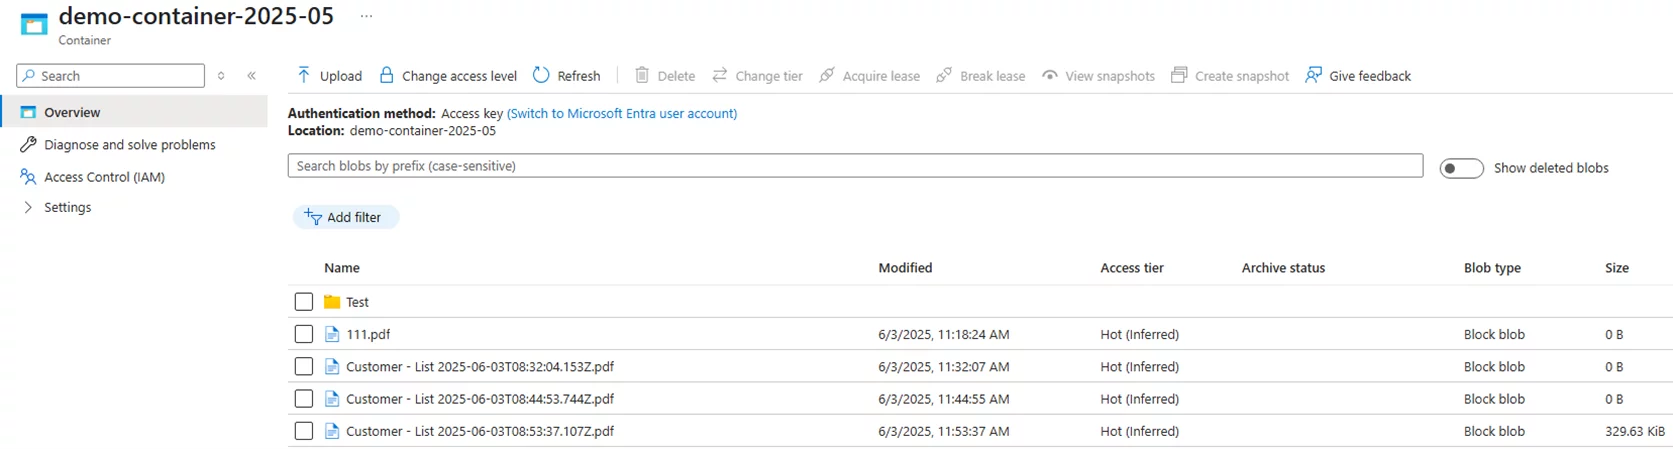
1. Select one of the storage accounts from the list (for example, “Demo Azure Blob Storage”) and click the Storage Browser action. The system will open the External Storage Browser page, which fully displays the content of the corresponding Azure Blob Storage container.
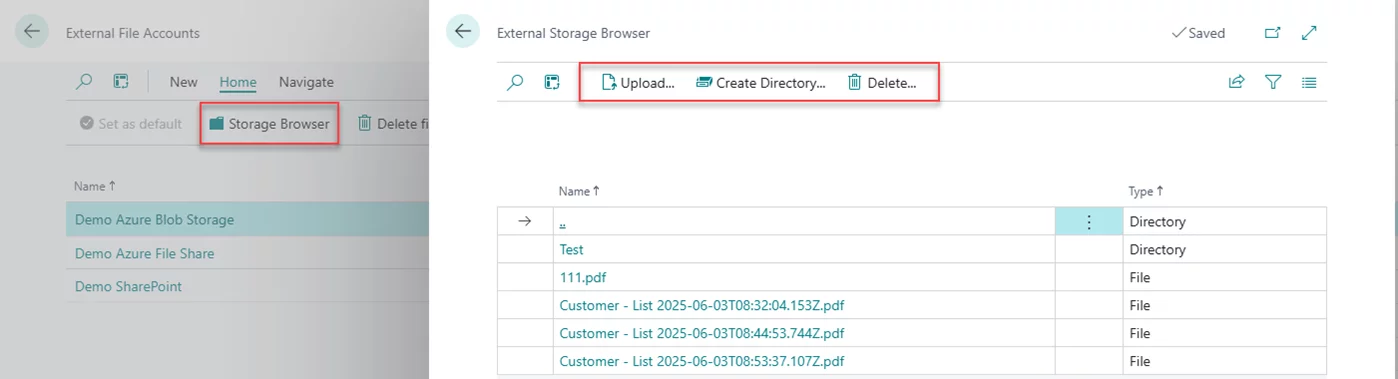
2. On the External Storage Browser page, you can perform several basic file operations within the configured Blob container:
- Upload a new file
- Download a new file
- Delete a file or directory
- Create a new directory
- Navigate through subdirectories inside your root container
You’ll have the same user experience when working with pre-configured Azure File Share

or SharePoint external storage accounts.

How the unified External File Storage API works
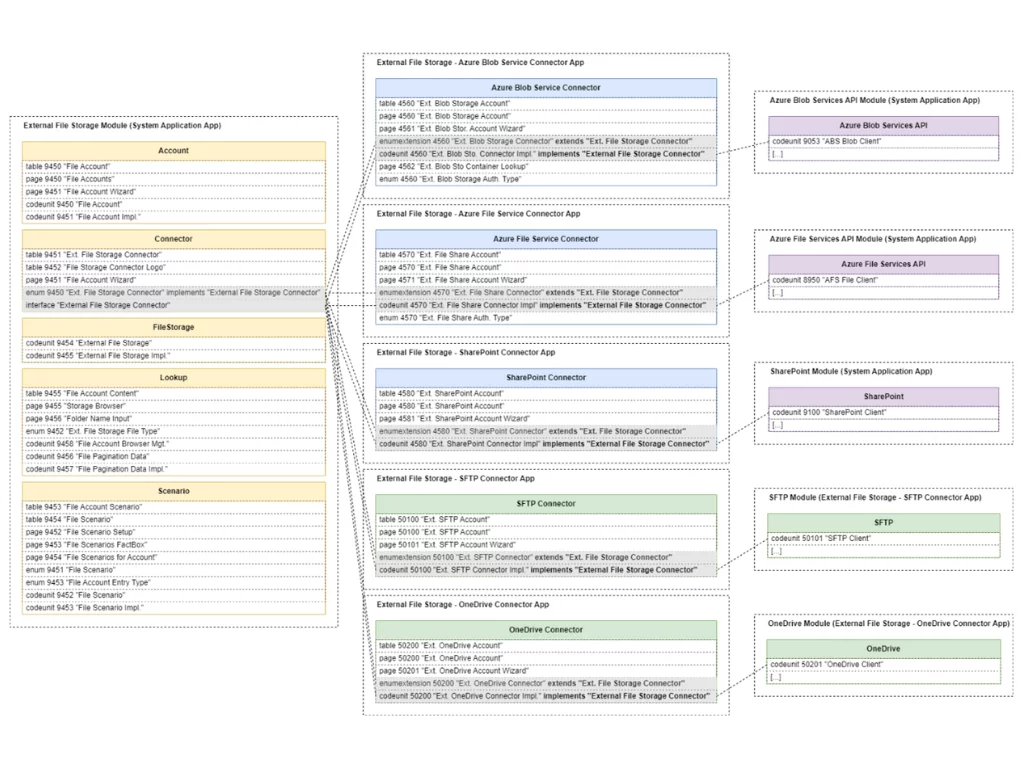
The External File Storage feature is built on a modular and extensible architecture, consisting of:
1. External File Storage module (part of the Microsoft System Application app).
Provides an easy-to-use API for storing files outside of Business Central.
2. Separate extension apps for different storage systems.
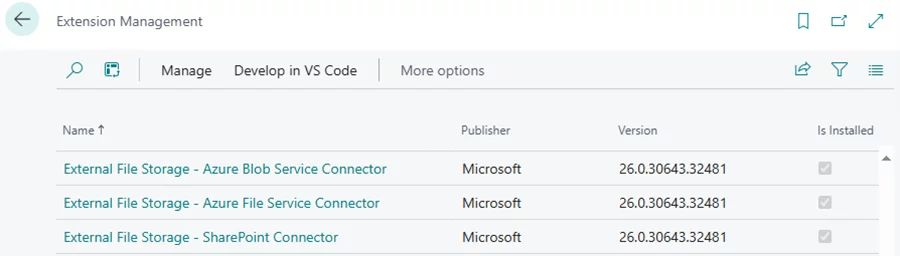
Each storage system (e.g., Azure Blob, FileShare, SharePoint, custom) implements a standard interface from the External File Storage module. As of now, three separate connector extensions are available out-of-the-box:
- External File Storage - Azure Blob Service Connector
- External File Storage - Azure File Service Connector
- External File Storage - SharePoint Connector
3. Additional modules within the Microsoft System Application that helps with interaction with the different storage systems:
- Azure Blob Services API module
- Azure File Services API module
- SharePoint module
A high-level overview of the unified External File Storage API is shown in the diagram below:

Each extension for a storage system must contain at least the following five core objects. Using the Azure Blob Service Connector as an example, these objects are:
- table 4560 "Ext. Blob Storage Account" - stores connection details for Azure Blob Storage accounts.
- page 4560 "Ext. Blob Storage Account" - card page to view or edit information from the "Ext. Blob Storage Account" table.
- page 4561 "Ext. Blob Stor. Account Wizard" - assists users in entering Azure Blob Storage account details when creating a new storage account.
- enumextension 4560 "Ext. Blob Storage Connector" - extends the list of storage accounts with a new storage type.
- codeunit 4560 "Ext. Blob Sto. Connector Impl." - implements the unified "External File Storage Connector" interface from the External File Storage module.
One of the key ideas is that the unified "External File Storage Connector" interface provides a set of predefined procedures for interacting with any external storage account, such as:
- ListFiles - Gets a List of Files stored on the provided account.
- GetFile - Gets a file from the provided account.
- CreateFile - Creates a file to the provided account.
- CopyFile - Copies as file inside the provided account.
- MoveFile - Move as file inside the provided account.
- FileExists - Checks if a file exists on the provided account.
- DeleteFile - Deletes a file exists on the provided account.
- ListDirectories - Gets a List of Directories stored on the provided account.
- CreateDirectory - Creates a directory on the provided account.
- DirectoryExists - Checks if a directory exists on the provided account.
- DeleteDirectory - Deletes a directory exists on the provided account.
- and more...
Each external file storage extension has its own “Connector Implementation” codeunit with logic for its specific storage system. However, all connectors expose the same set of methods with the same parameters, which makes the whole framework flexible, standardized, and future-proof:
- codeunit 4560 "Ext. Blob Sto. Connector Impl."
- codeunit 4570 "Ext. File Share Connector Impl"
- codeunit 4580 "Ext. SharePoint Connector Impl"
How to use the External File Storage module in your code
To use the External File Storage module in your AL code, you first need to define file scenarios and link them to your storage accounts. Here’s how to do it:
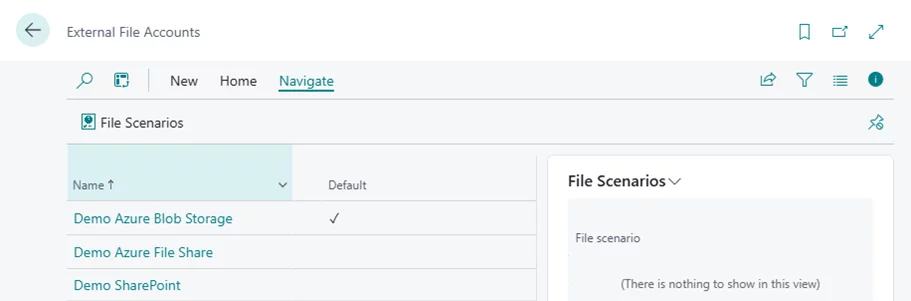
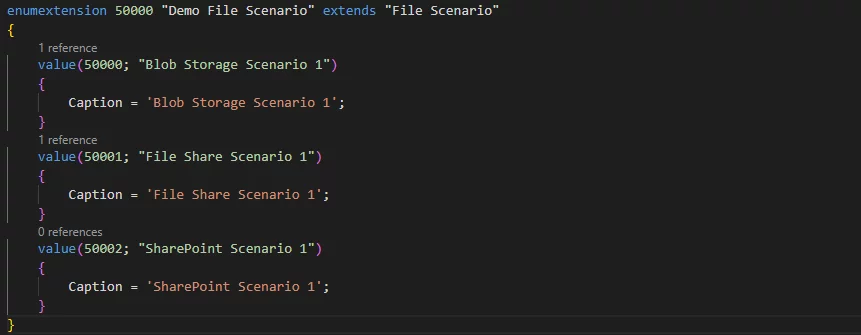
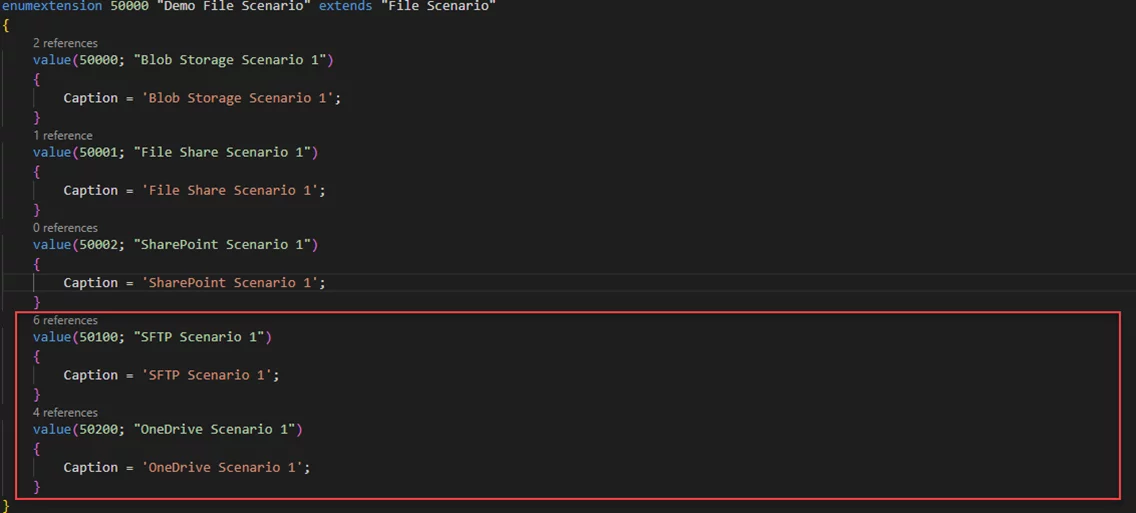
1. Create an enum extension for the standard enum 9451 "File Scenario" and add your custom scenarios. For example, you might create three scenarios for your three different storage accounts (e.g., Azure Blob, FileShare, SharePoint).
2. Open the External File Accounts page in Business Central web client and select File Scenarios.
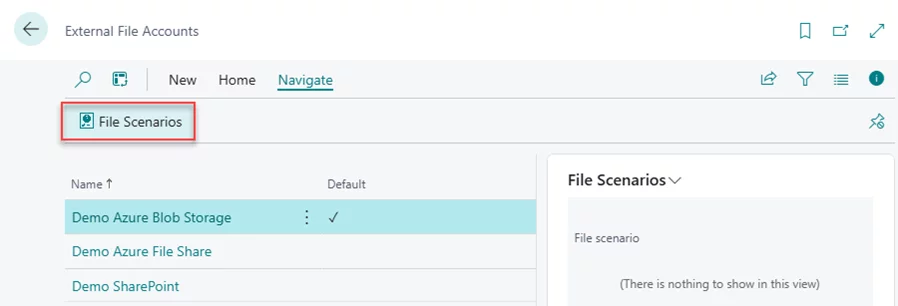
3. Assign the scenarios you created on step 1 to the corresponding external file storage accounts.
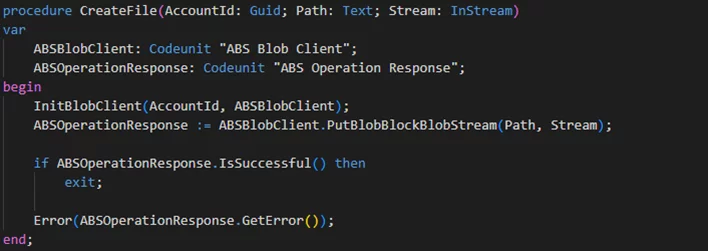
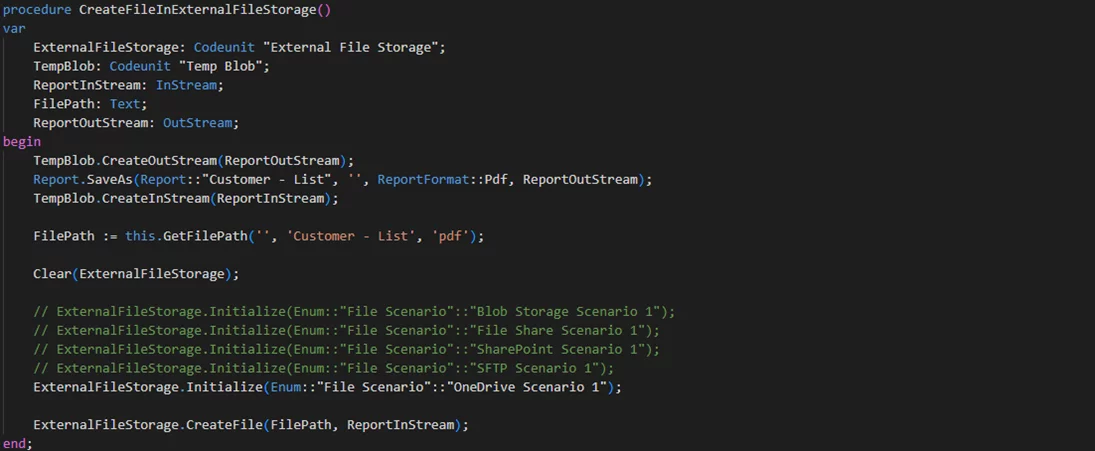
Now
you’re ready to interact with external file storage programmatically. You can
write a simple procedure to upload a file using codeunit 9454 "External
File Storage" from the External File Storage module.
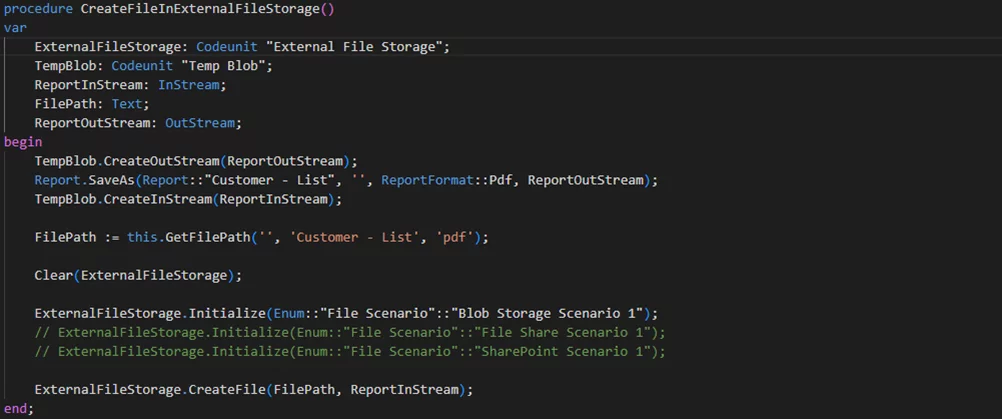
The same code pattern applies to all connected storage accounts, regardless of the provider. The only thing you need to change is the scenario name you set in the Initialize procedure before starting operations with another external file system.
Extending the External File Storage module
One of the most powerful aspects of this solution is its extensibility. Developers can add new storage providers by implementing a set of AL interfaces defined by the framework.
For example, to enable support for OneDrive or SFTP as additional external storage options, you need to do the following:
1. Create separate extensions for SFTP and OneDrive:
- External File Storage - SFTP Connector
- External File Storage - OneDrive Connector
2. Add the required set of objects to follow the External File Storage Module API architecture as described above. You can use the existing Azure Blob, Azure FileShare, or SharePoint connectors as examples.
3. Create corresponding "SFTP Client" and "OneDrive Client" codeunits that contain the logic needed to interact with the specific external storage systems.
After these extensions are created and installed, you will see two new external storage account types in the list of available file accounts:
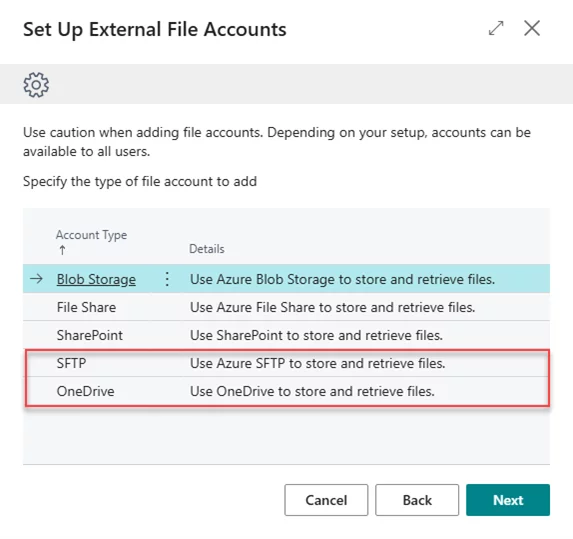
SFTP
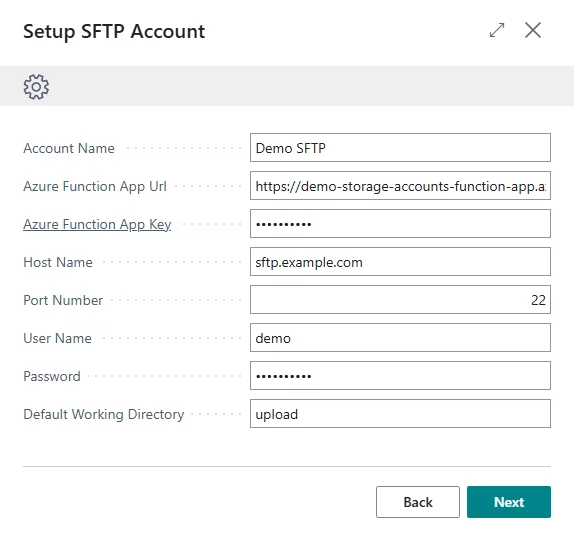
Use the External File Accounts wizard to fill in the required information and set up your SFTP account:
- Account Name: The name for the SFTP account.
- Azure Function App Url: The URL to your Azure Function App that will handle SFTP requests.
- Azure Function App Key: The Key of the Azure Function App.
- Host Name: The SFTP host name (e.g. sftp.example.com).
- Port Number: The SFTP server port number.
- User Name: The username for the SFTP server.
- Password: The password for the SFTP server.
- Default Working Directory: The default directory on the SFTP server (e.g., "upload").
After setup, you can use the Storage Browser action to check if the storage account correctly reflects the contents of your SFTP server.

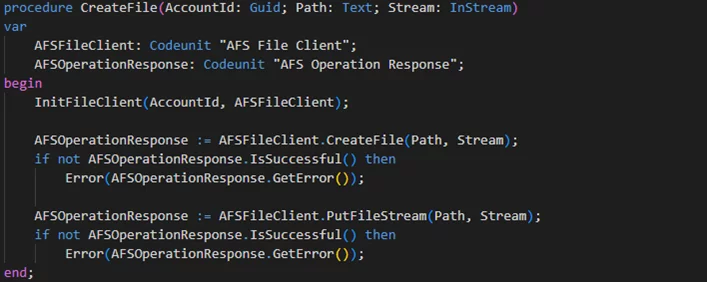
The
general architecture of the SFTP storage solution in our case is the following:

Let’s look in more detail at how it works based on the file creation operation:
- The unified CreateFile procedure from "Ext. SFTP Connector Impl." codeunit calls the CreateFile procedure from the "SFTP File Client" codeunit.
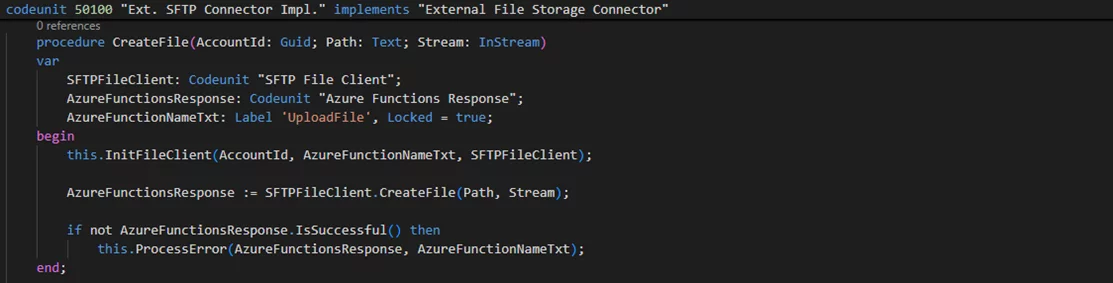
- The CreateFile procedure from "SFTP
File Client" codeunit passes the SFTP connection details and the
corresponding file (as a Base64 string) to the UploadFile Azure
Function through parameters.
- The Azure Function receives these parameters and calls its internal UploadFile handler function.

- The UploadFile handler function uses the Renci.SshNet library to upload the file to the SFTP server.

OneDrive
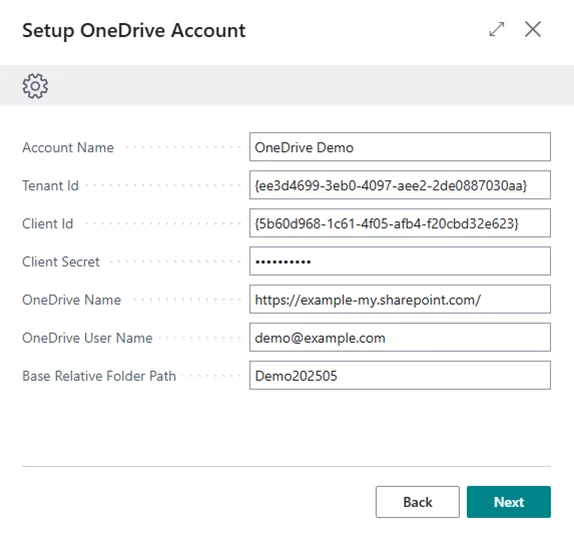
Use the External File Accounts wizard to fill in the required information for your OneDrive account:
- Account Name: The name of the OneDrive account.
- Tenant Id: The Tenant Id of the App Registration.
- Client Id: The Client id of the App Registration.
- Client Secret: The Client Secret of the App Registration.
- OneDrive Name: The OneDrive to use as the storage account.
- OneDrive User Name: The unique identifier of the user account whose OneDrive you want to access.
- Base Relative Folder Path: The default working directory (e.g., the user’s home directory or specific folder on OneDrive).
Again, use the Storage Browser action to verify that the storage account reflects your OneDrive content.

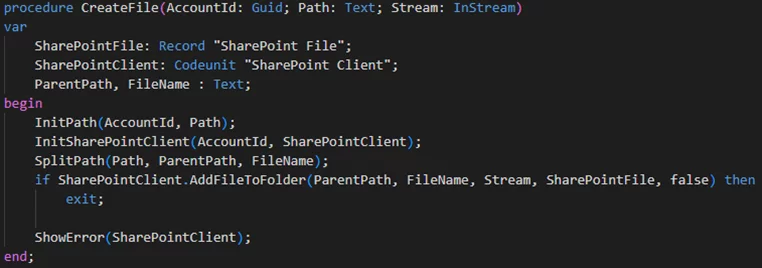
The general architecture of the OneDrive storage solution is as follows:

Let’s look in more detail at how it works based on the same file creation operation:
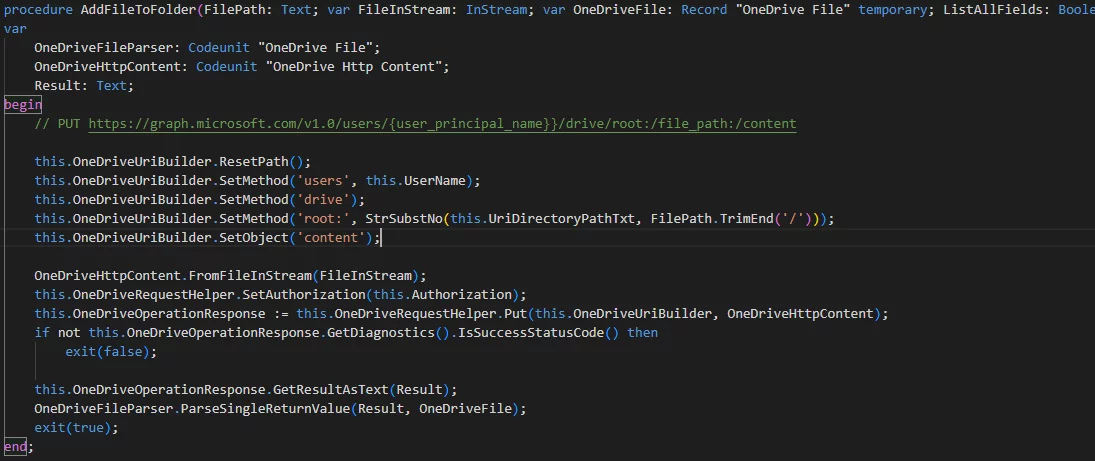
- The unified CreateFile procedure from "Ext. OneDrive Connector Impl." codeunit calls the AddFileToFolder procedure from the "OneDrive Client" client codeunit:
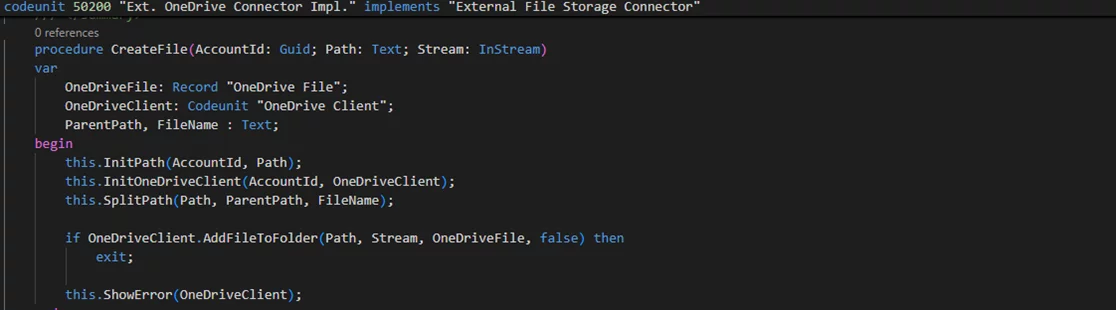
- The AddFileToFolder procedure from "OneDrive Client" sends PUT request to the relevant Microsoft Graph API endpoint:
IMPORTANT: You must configure the correct App Registration with the required permissions for the OneDrive API.
Required delegated permissions for interacting with OneDrive via Graph API may include:
- Files.Read
- Files.Read.All
- Files.ReadWrite
- Files.ReadWrite.All
- Files.ReadWrite.AppFolder
- Files.Read.Selected
- Files.ReadWrite.Selected
Required application permissions may include:
- Files.Read.All
- Files.ReadWrite.All
Now, you can extend the standard enum 9451 "File Scenario" with scenarios for your new storage accounts
and start using them in your code.
Conclusion
The introduction of the unified External File Storage module in Microsoft Dynamics 365 Business Central is a step forward in simplifying and standardizing how businesses manage external files in a cloud environment. By providing a single, extensible API interface for different storage providers, including out-of-the-box Azure Blob, FileShare, SharePoint, and any custom connectors like SFTP or OneDrive, Microsoft has improved the external file management experience for both developers and customers.
With this framework, solutions become more future-proof and easier to maintain. The ability to extend the framework with new providers ensures that your Business Central environment can adapt to changing business requirements and technological trends, allowing you to quickly switch to an alternative external storage system if needed. If you haven’t explored the External File Storage module yet, now is a great opportunity to consider its implementation and start using this unified API in your Business Central solutions.
References
For more detailed information, see the official Microsoft resources:
- Manage external files more easily through unified API in External File Storage module
- What's Cooking in Business Central: External File Storage Module
- External File Storage Module for Business Central
Do you happen to have any knowledge about Xpand?
Xpand is a product and service software development company with over 15 years of market experience and a Microsoft Partner since 2016, assisting organizations worldwide in managing their Microsoft Dynamics ERP systems. We provide a broad range of services for clients and partners, including implementation and development for Microsoft Dynamics 365 Business Central, as well as upgrade from earlier versions like Navision Financials 2.0. Learn more about our services at https://www.xpandsoftware.com/services.
Enjoyed the article? Check out another article of the author about technical writing and its nuances - How to automate acceptance testing in Business Central with the page scripting tool