Typically, each company has some routine transactions (i.e. purchases) for which the operationist’s decision is enough and those that require additional approval from the management. For example, you may need to control purchase of new items, sales orders for a specific customer or purchases for amounts higher than 10000 EUR. An easy-to-set-up functionality in MSDYN365BC allows automating of the approval process, which can put on hold a transaction before needed approver(s) have had it reviewed and accepted. The approvals functionality is not limited to working with purchase orders. You can utilize the approvals functionality while working with the following pages:
• Purchase orders and invoices
• Sales orders and invoices
• General, payment, cash receipt journals
• Items
• Vendors
• Customers
In this article, we will show you how to set up approvals in MSDYN365BC for a purchase order document and explain what the available setup options mean.
To set up triggering of approval requests inside of the company, we will need to perform setup on the following pages:
• Approval User Setup – specify the approver type and approver limits
• Workflows – specify the approval workflow and approver type per document type where approval is required
To set up automatic sending of approval notifications by email, we will need to perform setup on these pages:
• SMTP Mail Setup – specify an email account that will be used to send notifications
• Job Queue Entries – enable automatic sending of notifications
In this article, we will perform the setup on the four pages listed above, and then demonstrate the approval functionality for a specific case.
Setup
Approval User Setup
The Approval User Setup, as shown below, is divided into three key blocs, which are needed for the basic setup:
1. Approver Types
2. Approval Limits
3. Email Information

1. Approver Types
There are two possible ways to tell the system how to define the approver. When configuring a workflow, you will define which definition to use:
- User ID + Salespers./Purch. Code
Choose this definition of an approver type if you intend to use the purchaser/salesperson code on the purchase/sales documents as an approver of the document. In this case, the approval requester will be the user who creates the document. The approval request will be sent to the user associated with the salesperson/purchase code on this setup.
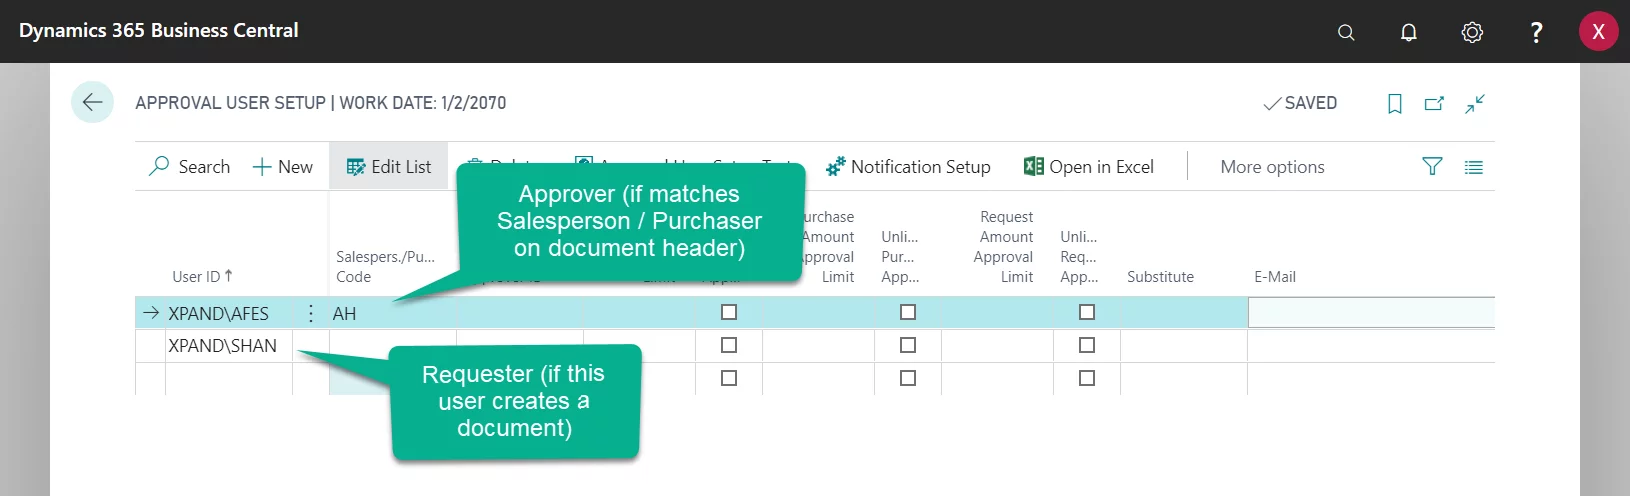
Choose this definition of an approver type to define the user that is a direct approver of another user. In this case, the approval requester will be the user who creates the document. The approval request will be sent to the user specified as Approver ID for the user who created the document.
In our example further in this article, we will be using this type of the approver for purchase documents.
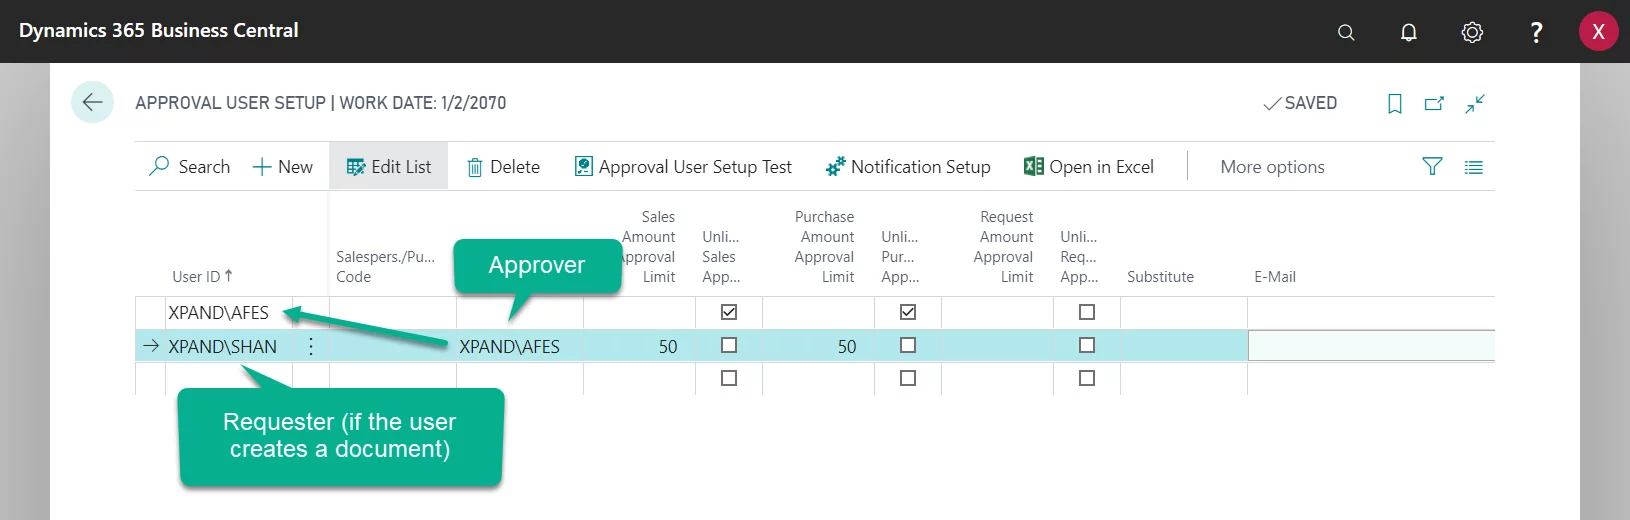
2. Approval Limits
Specify the amount in the Purchase Amount Approval Limit and Sales Amount Approval Limit fields. As a result, the user will be able to create and post purchase/sales documents that do not exceed this amount without requesting approval.
For example, if you specify 50, this will mean that if the requester creates or modifies a document the total amount of which is up to 49 LCY, no approval will be need. If the total amount of the document exceeds 49 LCY, it will not be possible to post the document before it has been approved.
For the user who is approver, you may set up the limits as well. Thus, an approval hierarchy can be established. Select the Unlimited Sales Approval / Unlimited Purchase Approval check box for the users who have limitless approval rights.
Then, you can use the Request Amount Approval Limit field to limit the amount that the user can request for approval.
3. Email Information
Specify the email to which the approval related notifications should be sent.
Workflows
Starting with Microsoft Dynamics NAV 2016 and higher, the approval functionality is based on workflows, while in earlier versions the approvals functionality was different.
Workflows are basically a set of events and the corresponding responses to these events. This is quite useful, since you can add or delete responses, depending on business needs. In standard MSDYN365BC, you will find several pre-configured workflows that are ready to be used.
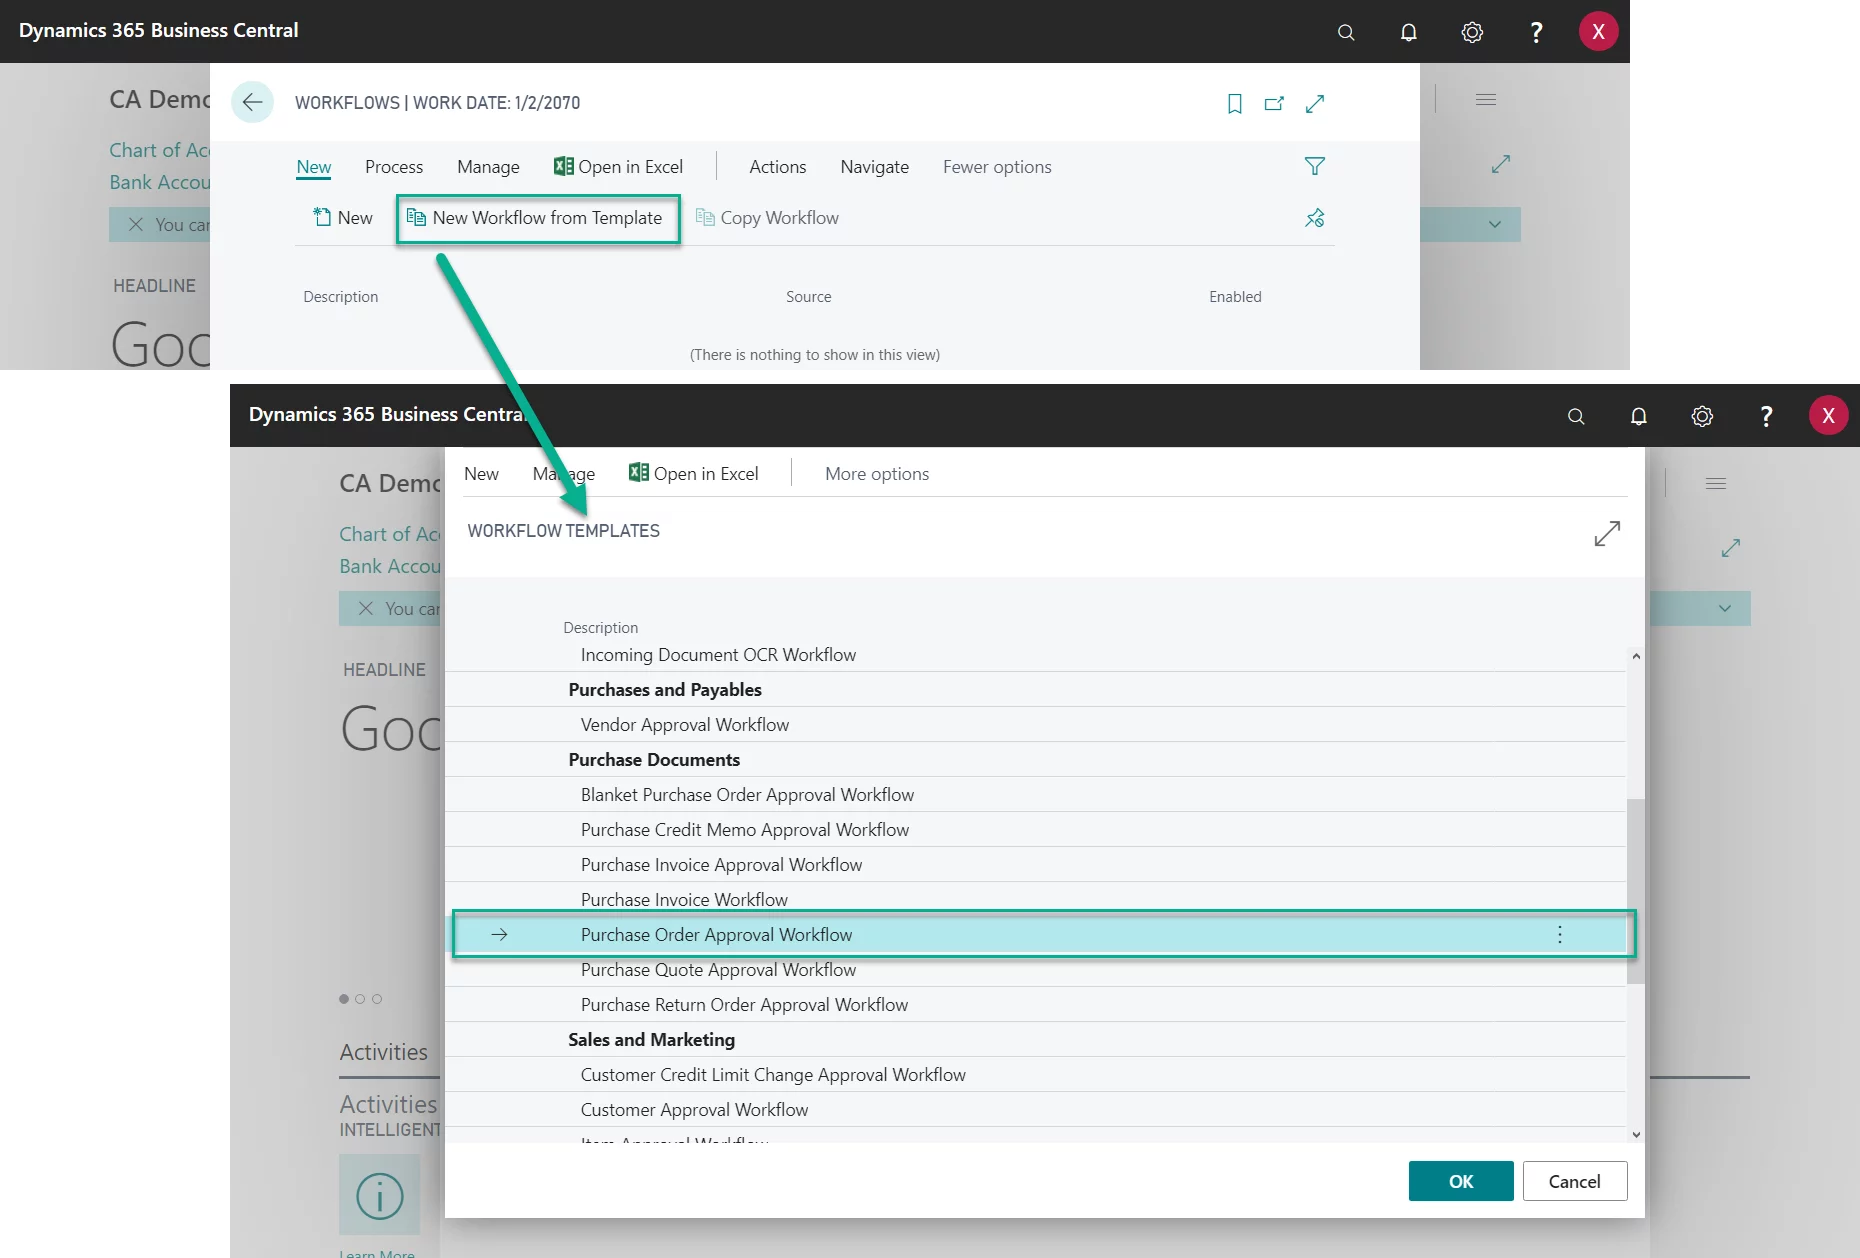
To start using the workflows, go to the Workflows
page, choose the New Workflow from Template action, and then choose OK.
You will see the list of the existing workflow templates, grouped by functional
area.
In our example, we will create a workflow from
the Purchase Order Approval Workflow template which belongs to the
functional area Purchase Documents. Alternatively, you could create your
own workflow, by choosing the New action on the ribbon of the Workflows
page or even create new workflow templates on the Workflow Templates page.
A new workflow is automatically created based on the selected template. It consists of the following parts:
1. General Information (Header)
2. Workflow Steps (Lines)
3. Workflow Responses (FactBox)
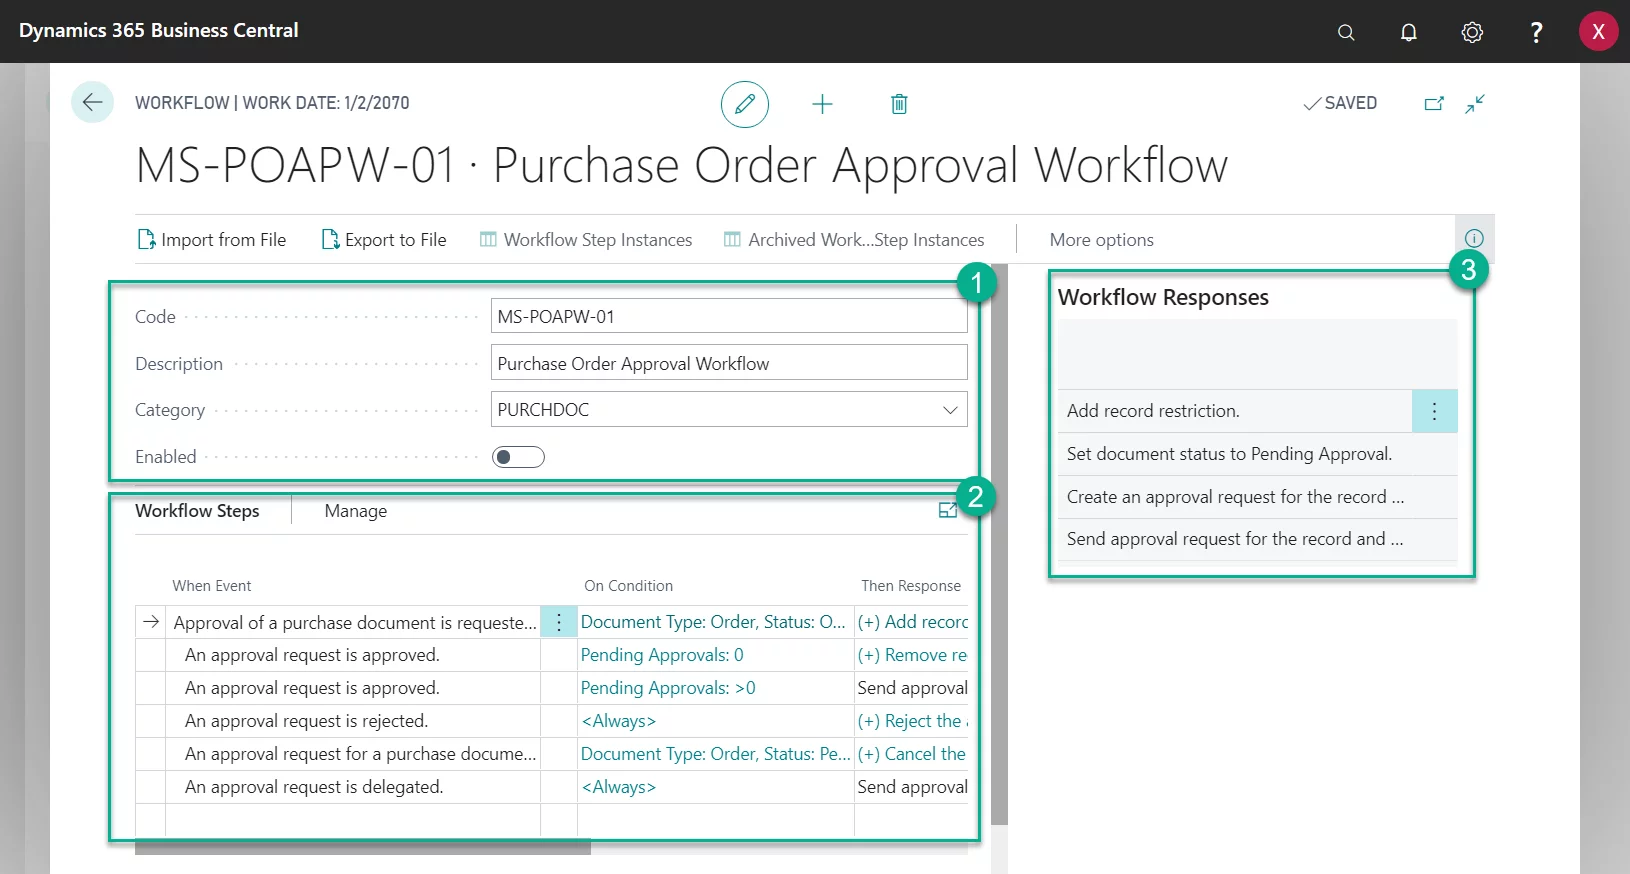
Before we can enable our new workflow for
usage, we need to choose the appropriate approver type for the approval request
of a purchase document. For this purpose, locate the first line of the Workflow
Steps (When Event = Approval of a purchase document is requested), and select
the value in the Then Response field. A new page is opened, where you
will see a set of actions MSDYN365BC will perform when a purchase approval
request is sent. 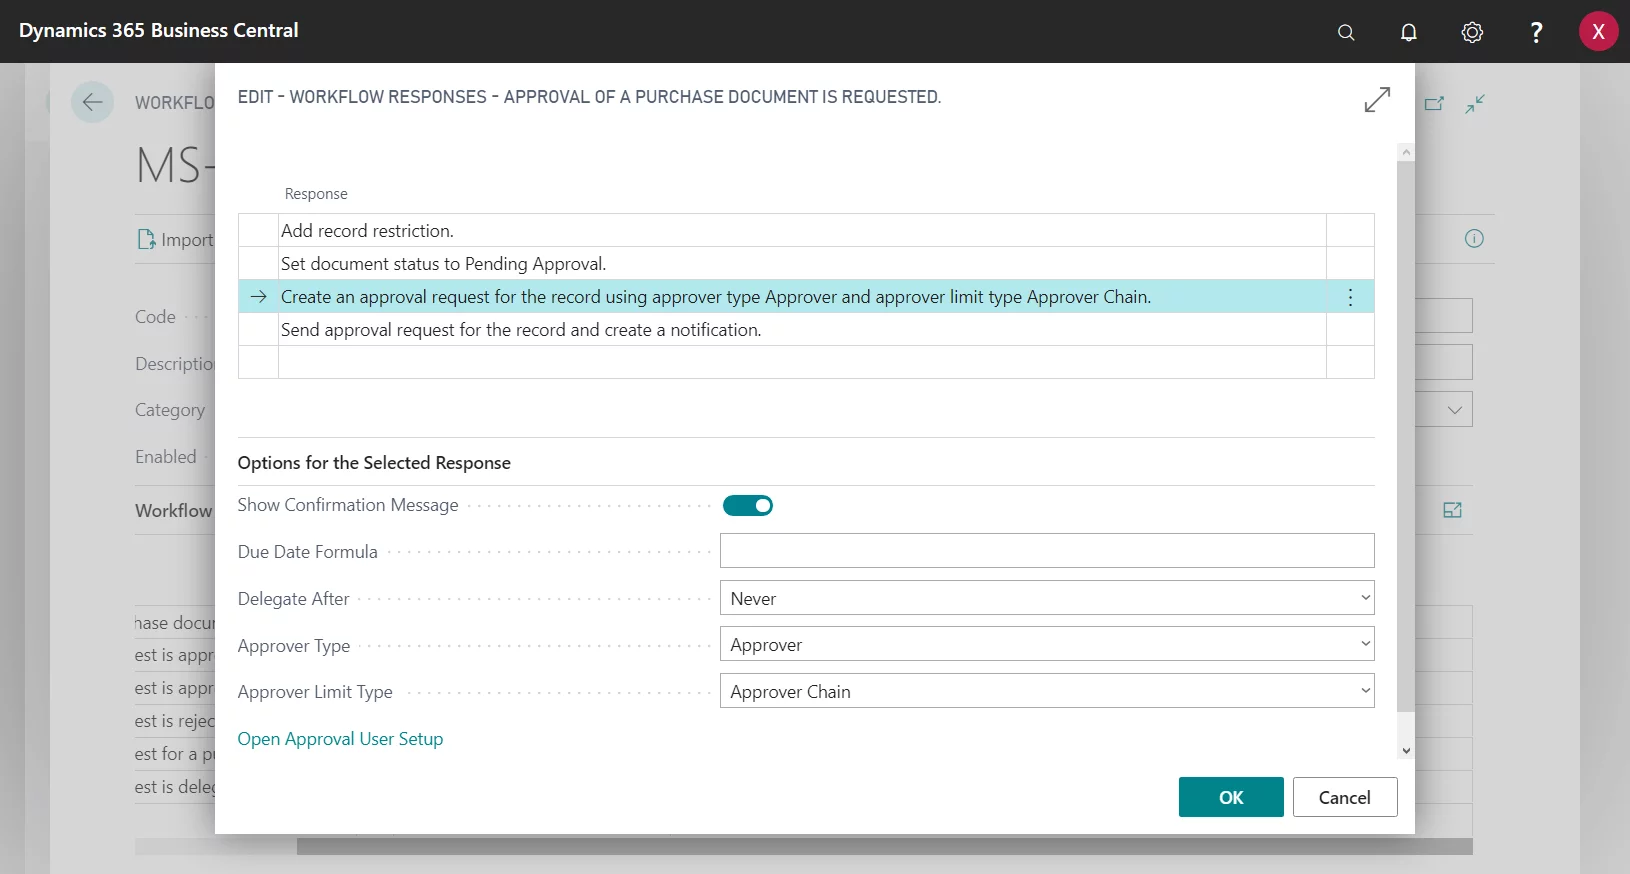
• Add record restriction – Read this as: once the approval request is sent, the document cannot be edited/used anymore.
• Set document status to Pending Approval – The Status of the document is changed from Open to Pending Approval.
• Create an approval request for the record using approver type %1 and approver limit type %2 – Here we need to specify the approver type and the approver limit type.
• Send approval request for the record and create a notification – The request will be created inside MSDYN365BC. Additionally, an automatic notification will be sent to the approver, provided we have specified an approver email, created SMTP Mail Setup, and enabled the corresponding job queues (we will address these setups later in the article).
In the following section, we will discuss the
meaning of the Approver Types and Approver Limit Types options for the Create
an approval request for the record using approver type %1 and approver limit
type % response:
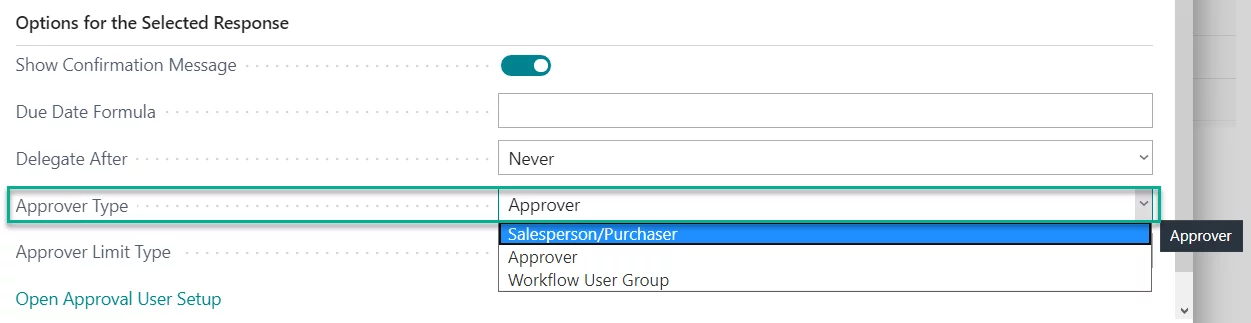
The goal of this field is to dynamically setup the recipients of the approval requests.
- Salesperson/Purchaser – select this type of the approver if you would
like to use the salesperson/purchaser of the document as an approver. This type
will use the User ID + Salespers./Purch. Code mapping on the Approval
User Setup page.
- Approver - select this type of the
approver if you would like to use the direct approver, which was set up for
requesting user. This type will use the User ID + Approver ID mapping
on the Approval User Setup page
- Workflow User Setup – select this approver type if you would like to create or already have created a separate approval chain that consists of multiples users other than those specified on the Approver User Setup page.
• Approver Limit Type:
The goal of this field is to set limits as to how far the approval request must travel upward the approval user hierarchy. This is particularly useful if you use Approver Type = Approver and each next approver has his own approver user. The approval limit type setup can be used to find a shortcut in this hierarchy or go all way through.
Now, you might be asking yourself: Why do you create a long hierarchy of approvers and then choose to shortcut it? Well, this is because all workflows look the same Approval User Setup page, but MSDYN365BC provides ways to have a variety of behavior for different workflows while working with only one Approval User Setup.
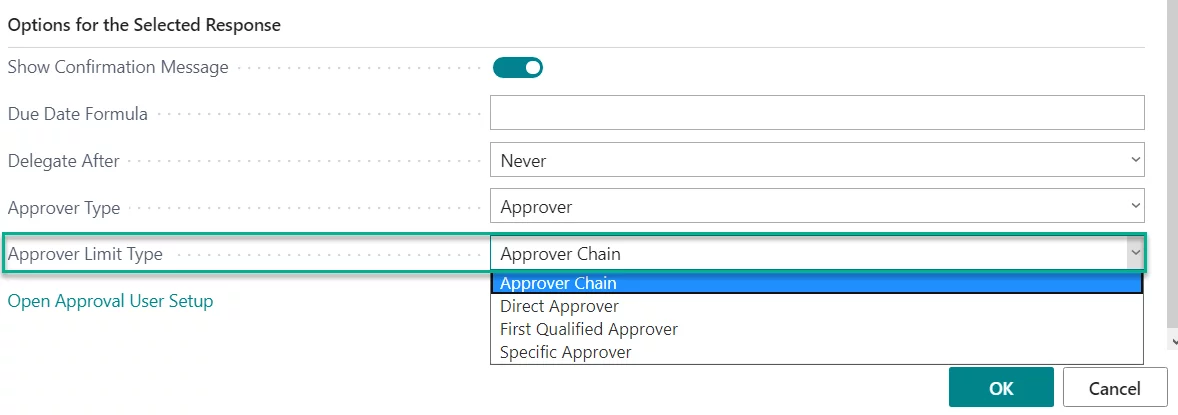
Now, let us investigate the options provided for the Approver Limit Type:
- Approver Chain - The approval request will be sent to each approver in the approval hierarchy until an approver with the sufficient approval limits is found. For example, if User 1 has approver User 2, and User 2 has approver User 3 (that has sufficient approval limits), an approval request will travel until it reaches User 3. Only after the last approver has approved the request, the document can be posted.
- Direct Approver - MSDYN365BC will send the approval request to the next user in the approval hierarchy, ignoring all approvers that are above. The approval limits that the user might have are not considered by MSDYN365BC. For example, if User 1 has approver User 2 (that has insufficient approval limits), and User 2 has approver User 3 (that has sufficient approval limits), MSDYN365BC will send an approval request by User 1 to User 2 only.
- First Qualified Approver - MSDYN365BC will find the first approver user who has sufficient approval limits and ignore all the users who are in the middle. For example, if User 1 has approver User 2 (insufficient limits), and User 2 has approver User 3 (that has sufficient approval limits), MSDYN365BC will send the approval request to User 3 only.
- Specific Approver – If you choose this option, you will need to additionally specify the specific approver user. The approval request will be sent only to the user specified as specific approver.
NOTE: No approver hierarchy can be set up if you use approver type Salesperson/Purchaser Code, since only one salesperson/purchaser code can be selected on the document header.
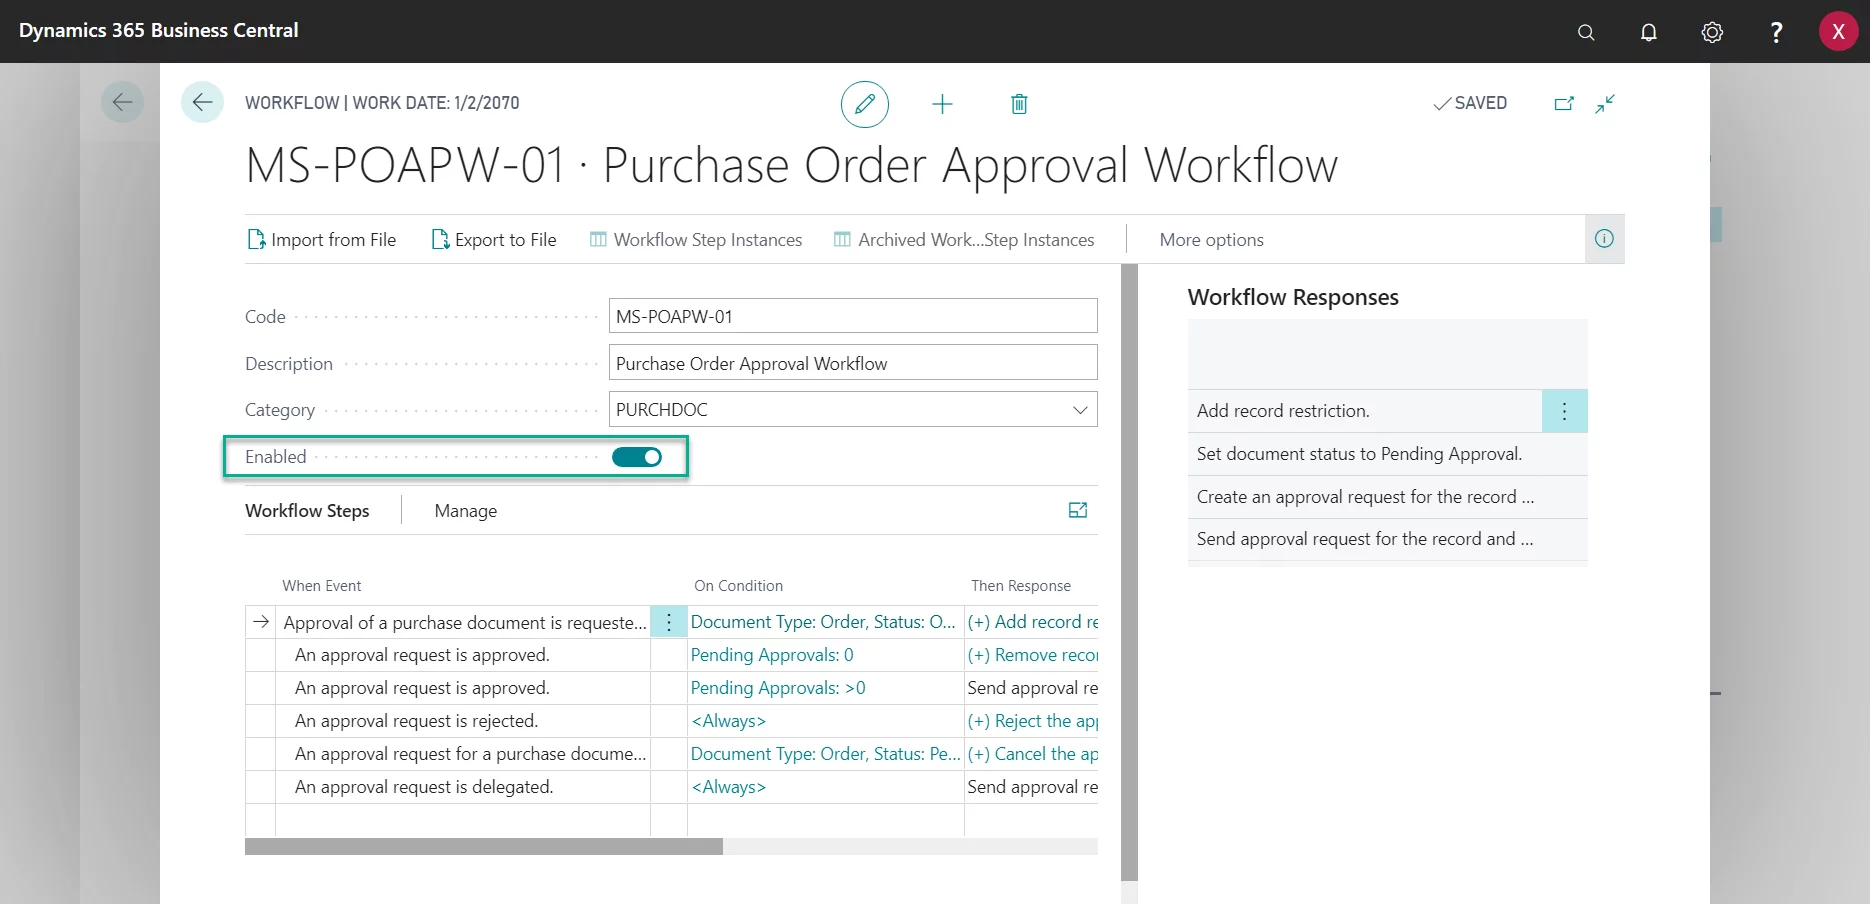
In our example, we will select
Approver Limit Type: Approver Chain. Once you have specified the approver type and the approve limit type, the conditions and responses copied from the template can be used without any additional modification. To start using your new workflow, select the
Enabled check box on the workflow card
SMTP Mail Setup
In the SMTP Mail Setup, we specify
which email account will be used to send approval-related notifications. We can
set this up manually on the SMTP Mail Setup page, or use a setup wizard,
which will guide us through the setup. You can find this wizard on the Assisted
Setup page.
In our example, we choose to set up the email via
SMTP Mail Setup page.
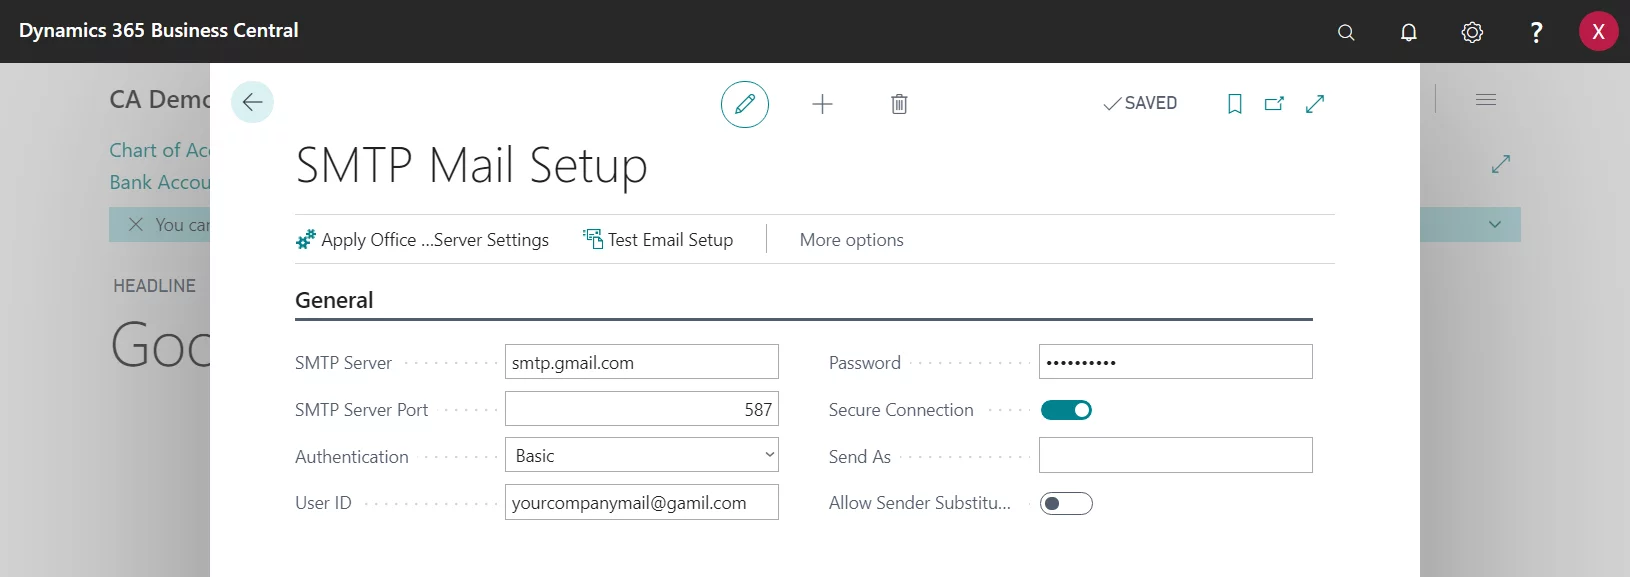
SMTP Server – the SMTP server of the email service you use
SMTP Server Port – the SMTP server port of the email service you use
Authentication – we choose Basic
User ID – this is the email that will act as a sender of email notifications
Password – enter the password to the email you specified in the User ID field
Secure Connection – select this check box
NOTE: Make sure that POP/IMAP has been enabled for the email account you specified in the User ID field.
Job Queue Entries
Job queues in MSDYN365BC allow you to enable specific codeunits/reports to automatically run with regularity that you need. In our case, we want to use them to automatically send email notifications.
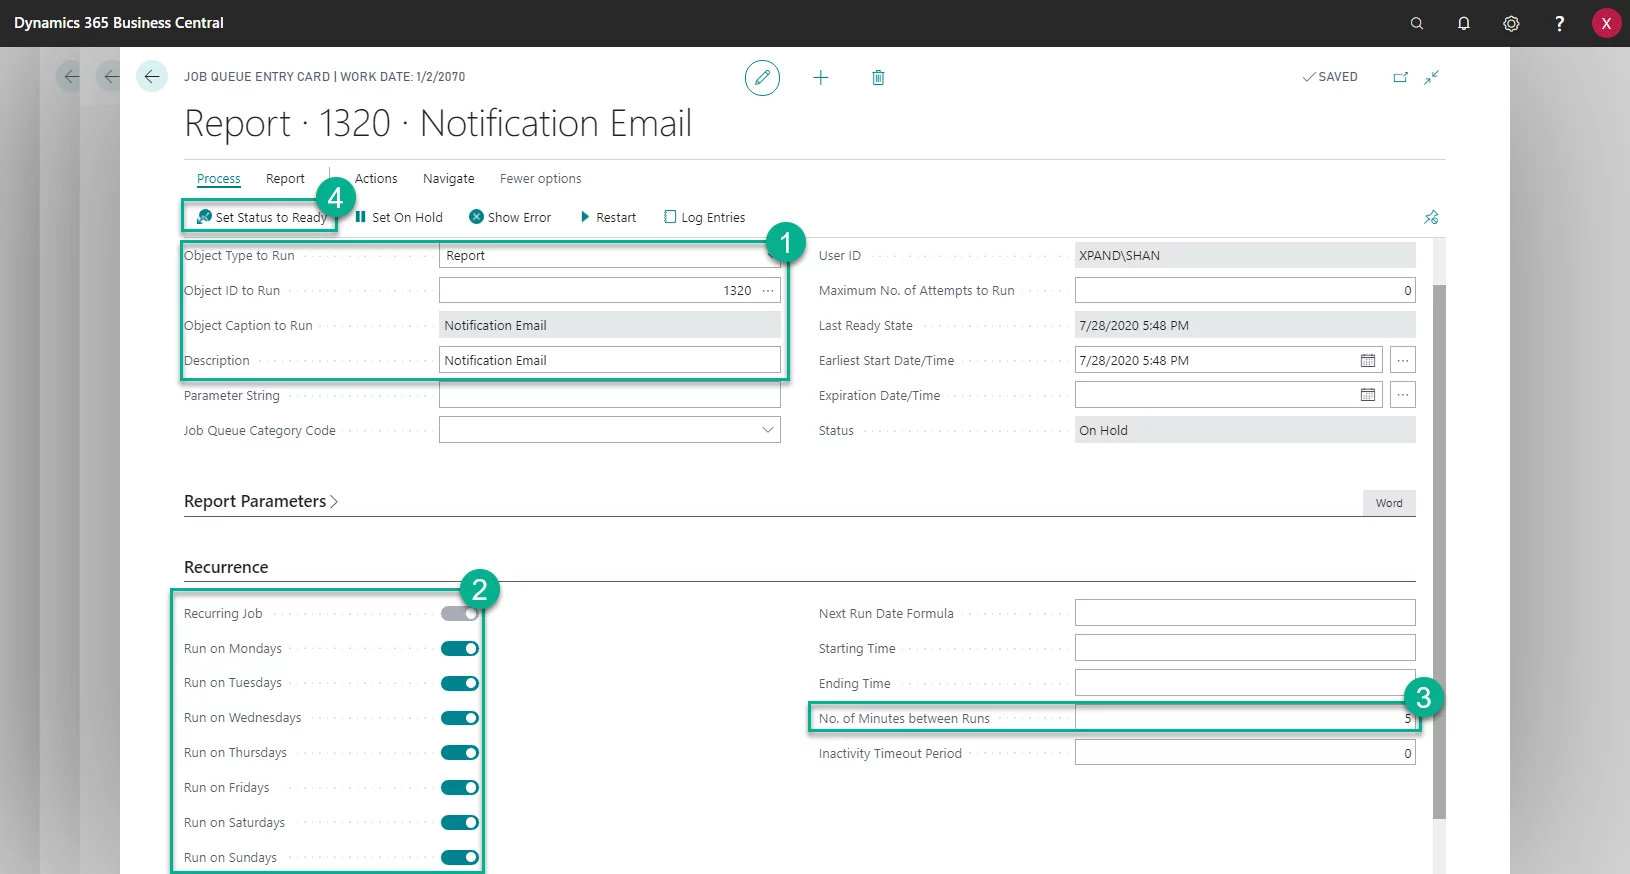
Follow the steps below to create a job queue which automatically sends notification emails in MSDYN365BC:
1. Create a new job queue entry. In the Object Type to Run field, choose Report, and in the Object ID to Run field, choose 1320.
2. On the Recurrence FastTab, check the days on which the report will be automatically run. If you select multiple days in the week, the Recurring Job check box will automatically become selected.
3. Specify the interval between the runs of the job queue in the No. of Minutes between Runs field. In our example, we specified 5 minutes.
4. Use the Set Status to Read action on the ribbon of the job queue entry to enable it.
Now, we are ready to test the purchase document approval setup that we have created.
Trying the Approvals Functionality
Previously we have configured the approval user setup for two users: The user XPAND\SHAN has purchase approval limits <50, and approver user XPAND\AFES has unlimited approval limits. We have further created and enabled a workflow for purchase orders, for the Approver Type = Approver and the Approval Limit Type = Approver Chain.
Now, let us try our setup for an actual case.
When we create a purchase order as user XPAND\SHAN for 49 LCY and try to post it, we receive the following error:
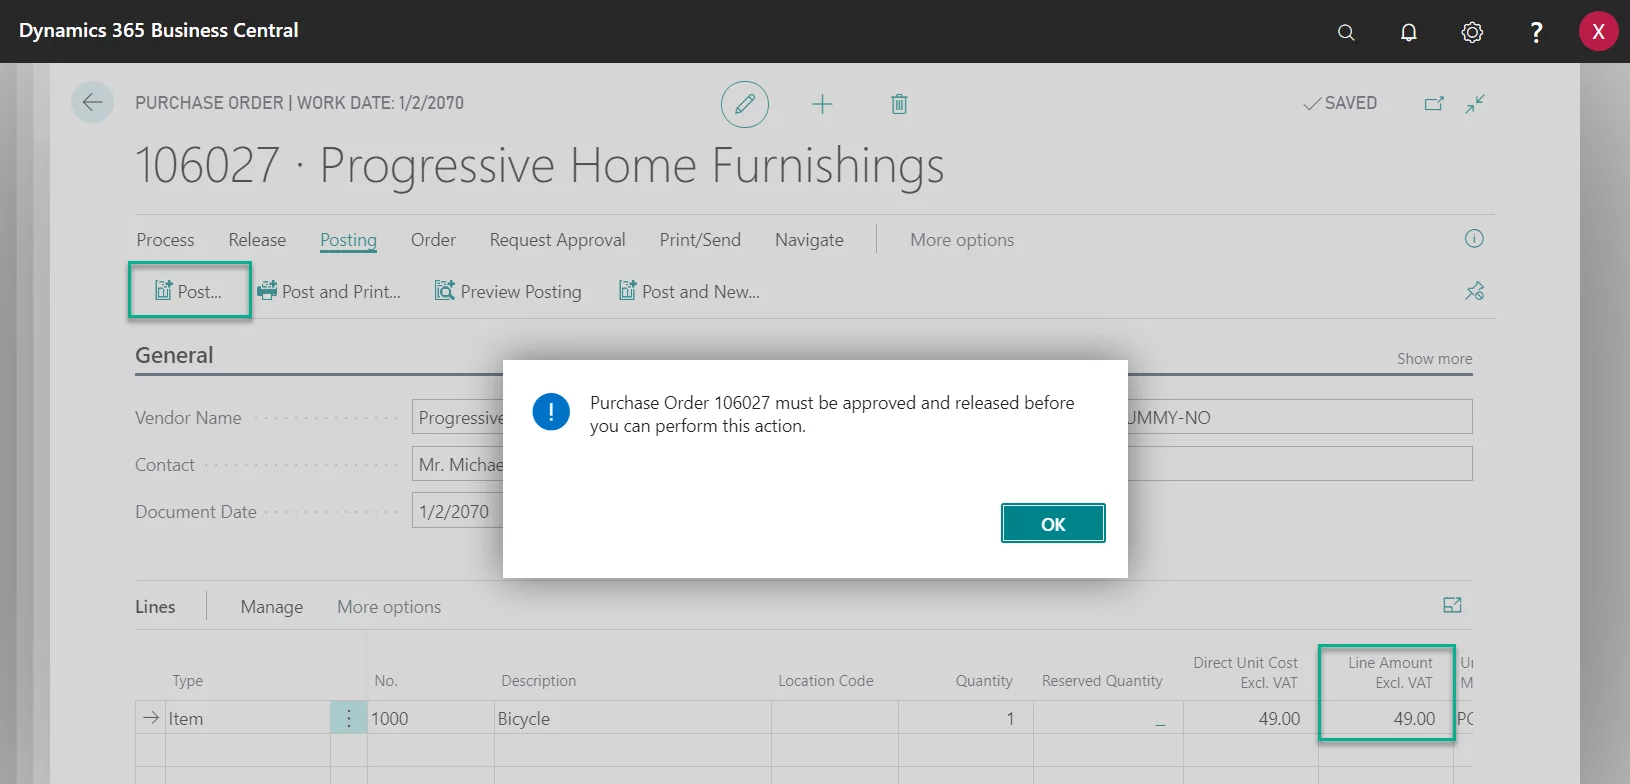
This means that our workflow for the approval of purchase orders works